
imMail - Messaging and Collaboration for Zimbra
By: immail
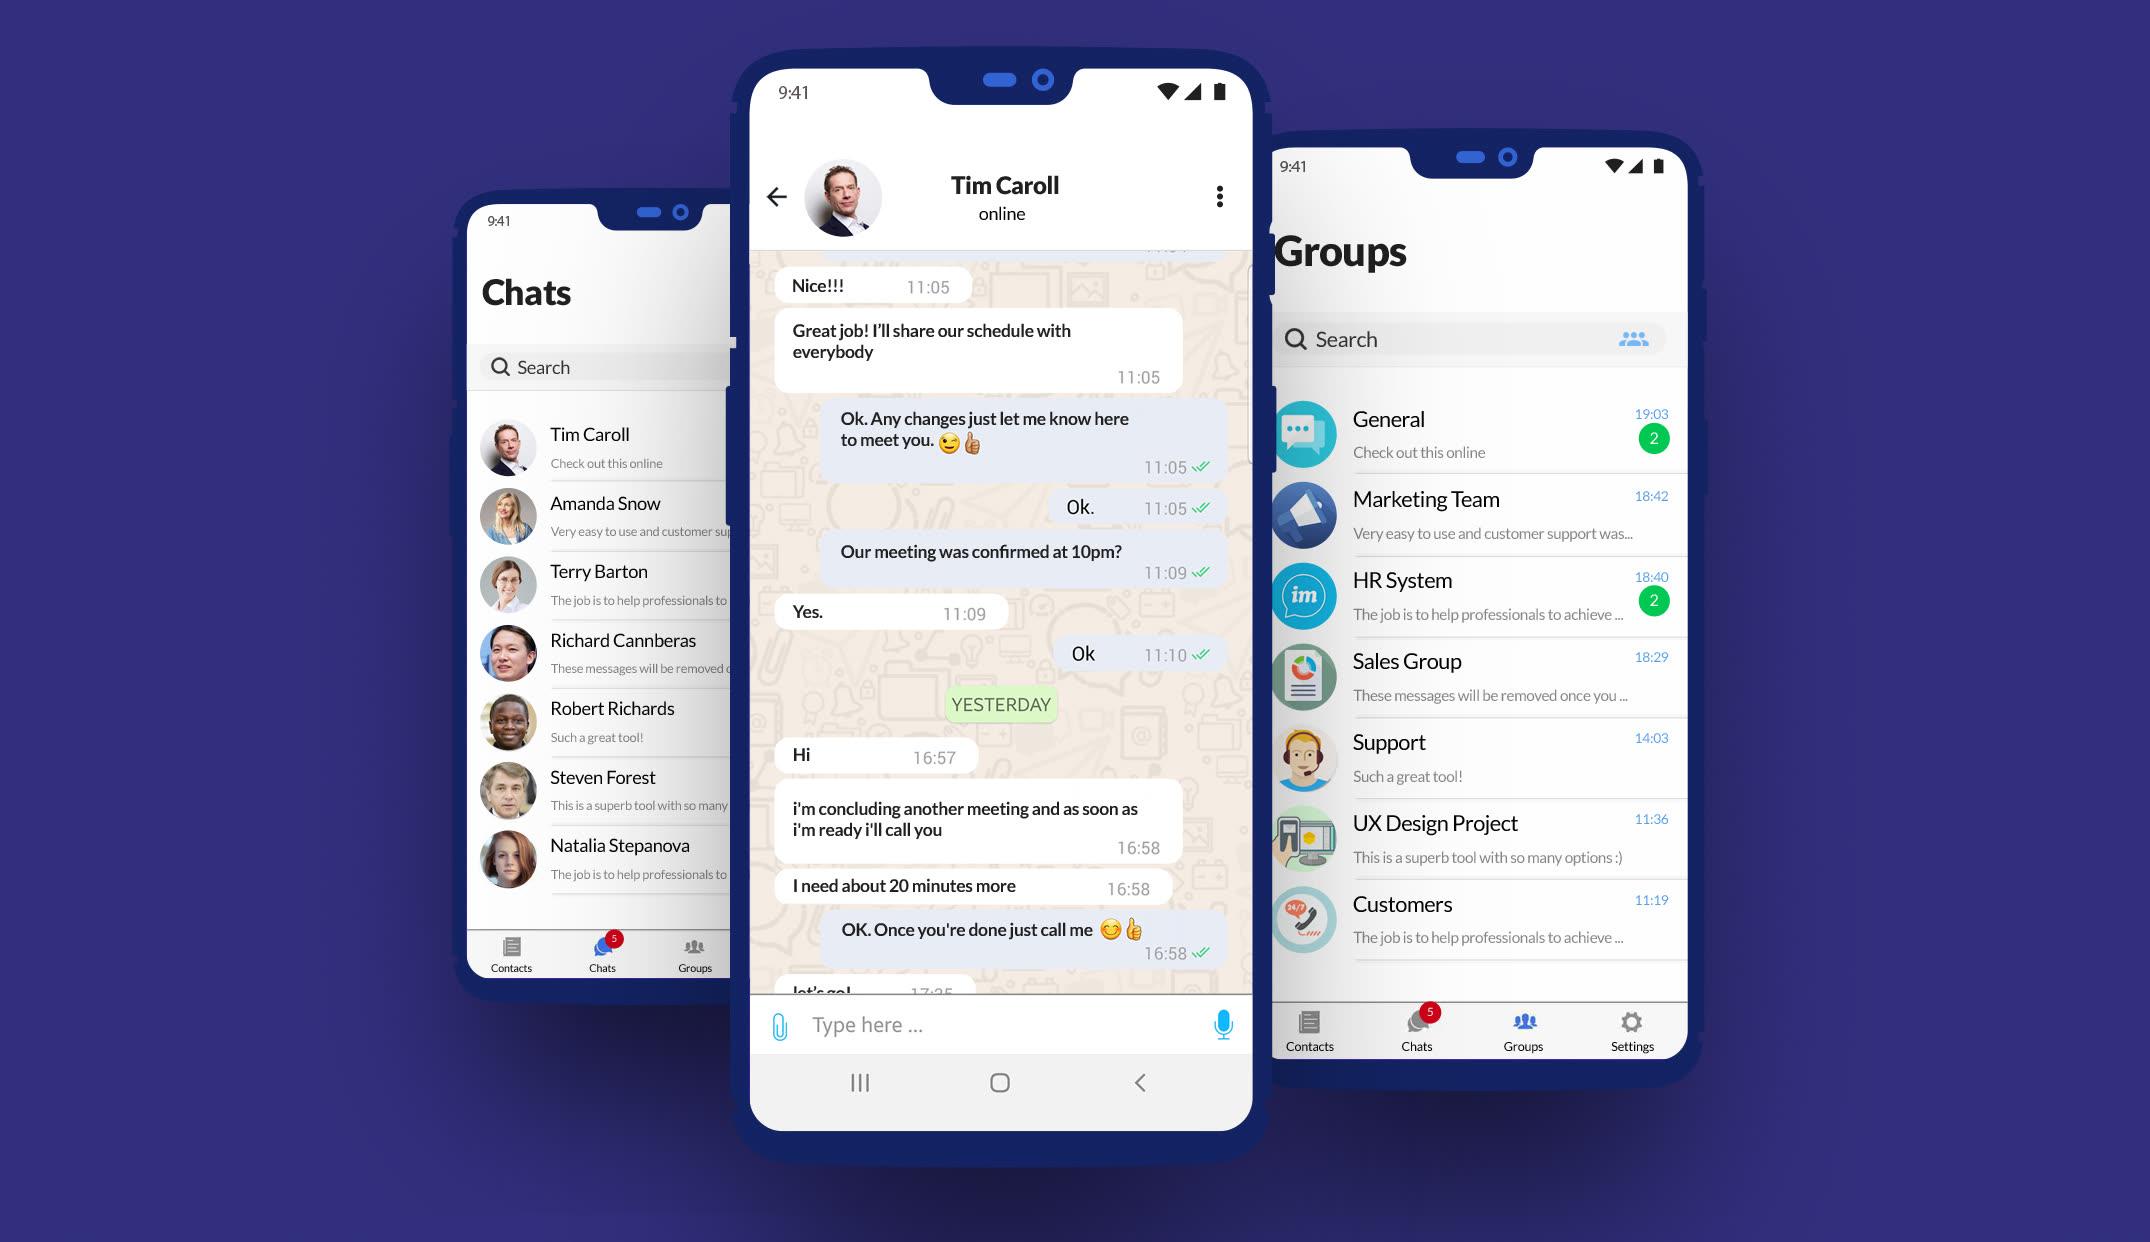
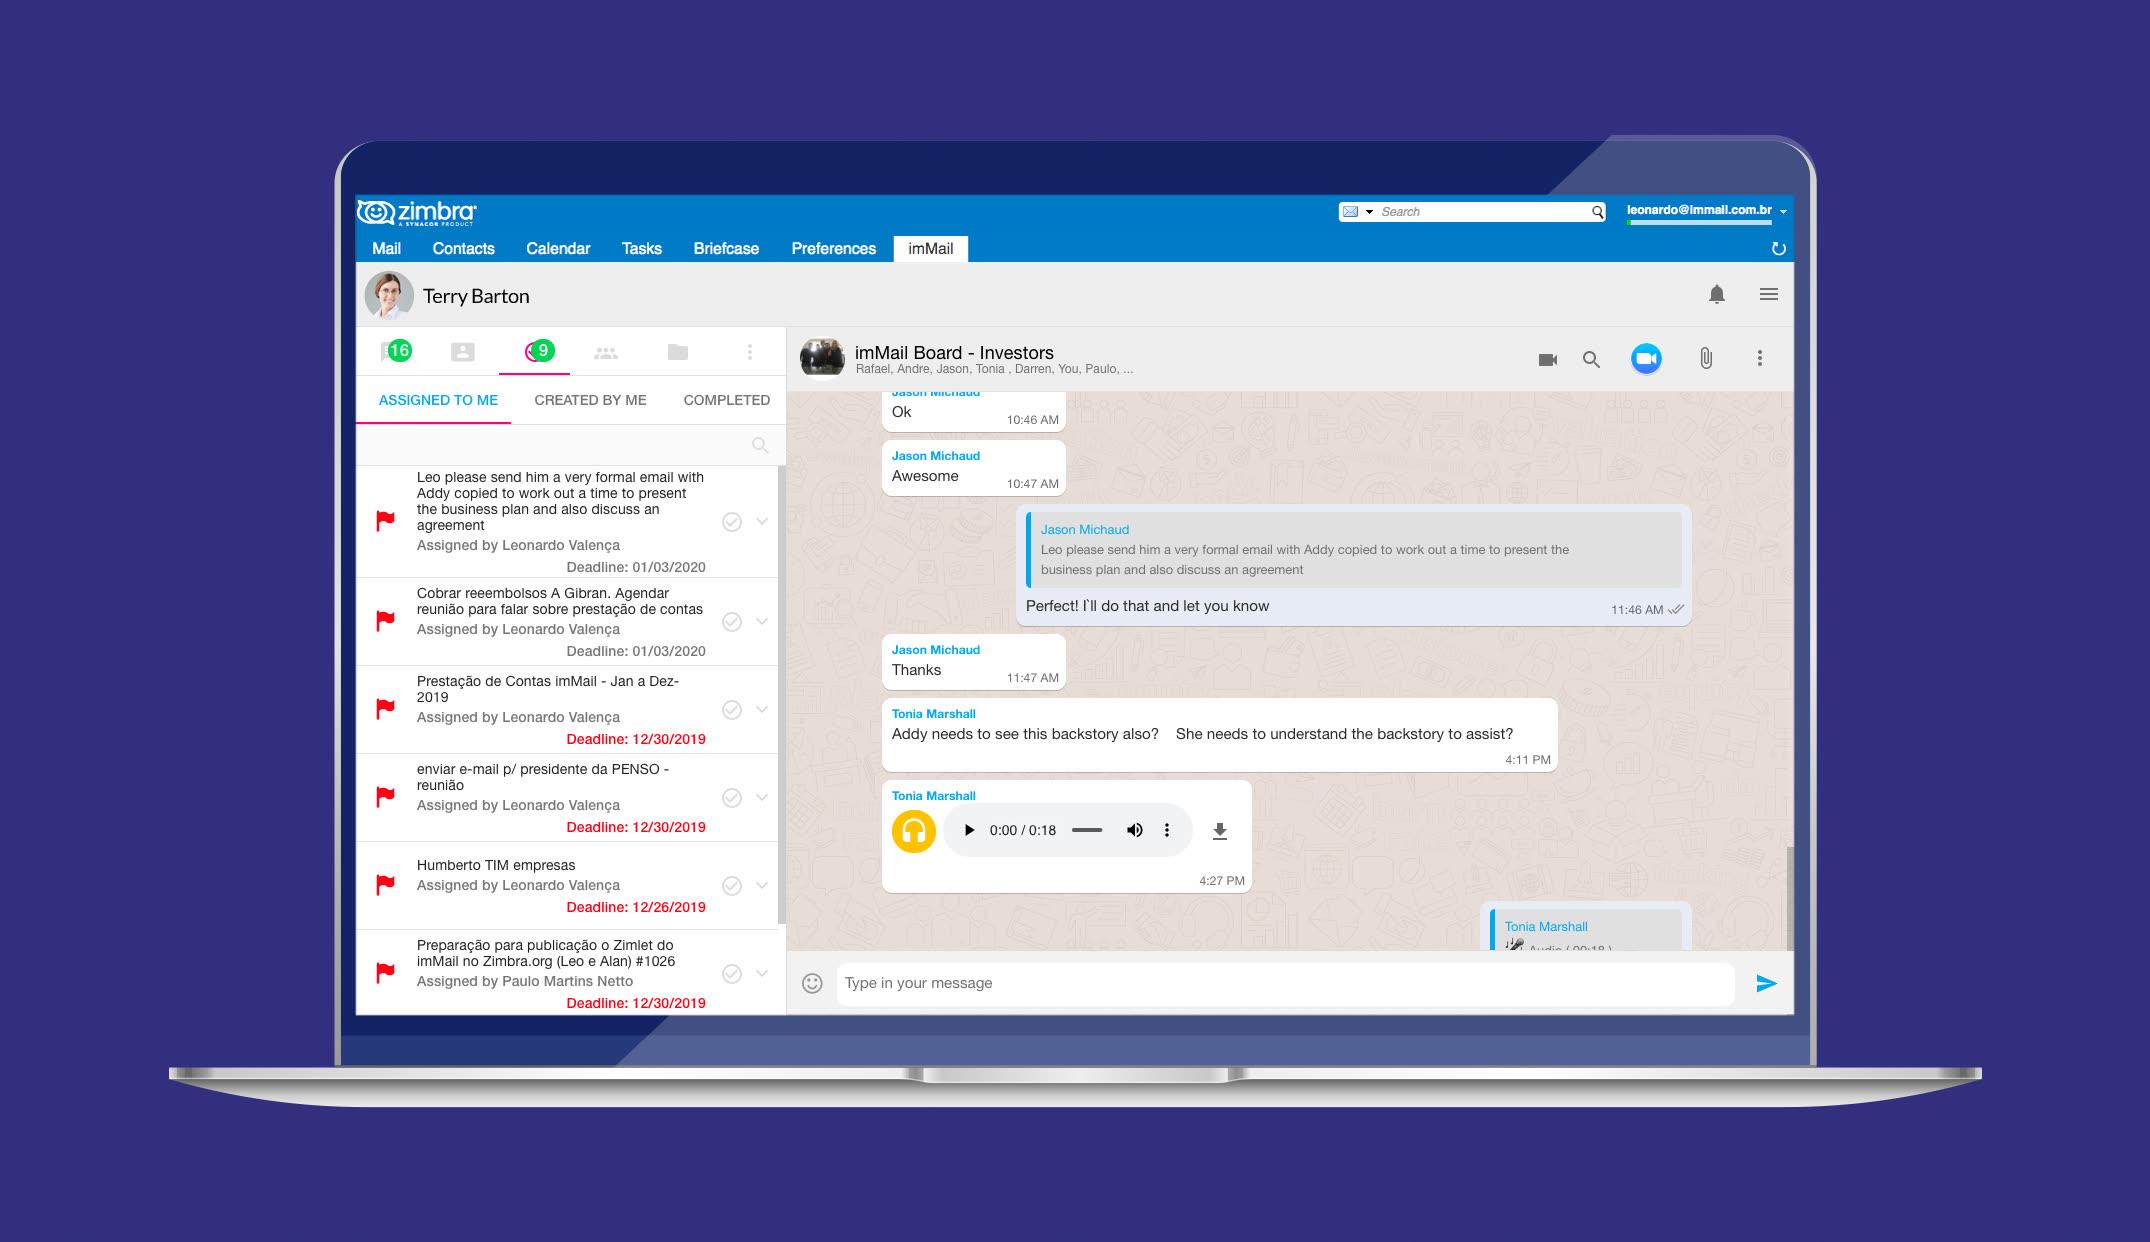
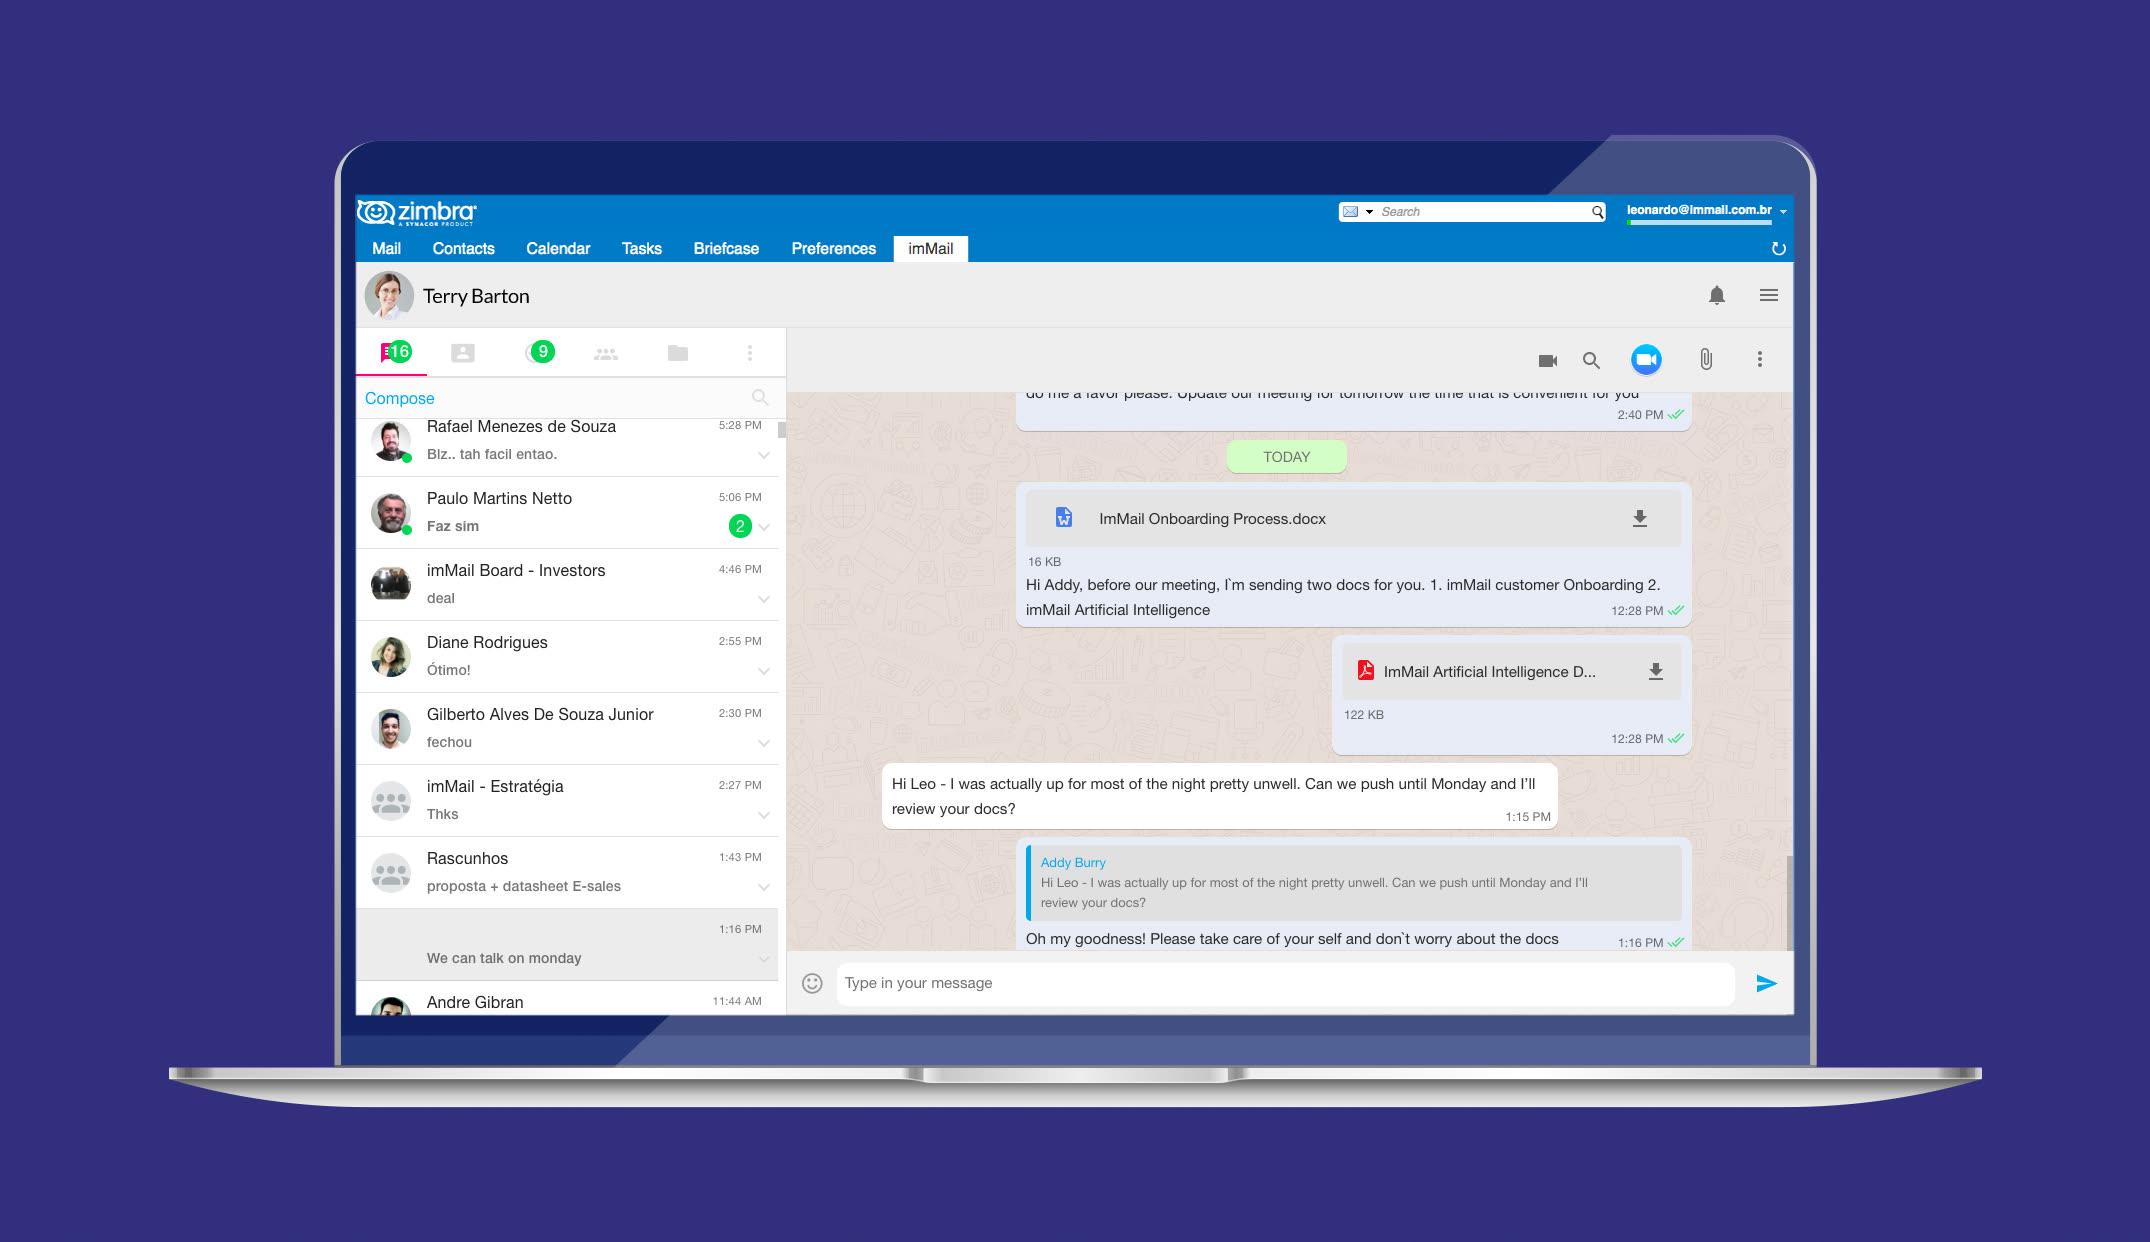
Use imMail Zimlet to:
- Talk to your employees and suppliers
- Create messaging groups
- Create, Assign and Manage Tasks
- Do Video Conferences
- Send an instant message to all employees
- Upload and share documents and directories
- Integrate with HR, CRM, ERP and SCM platforms
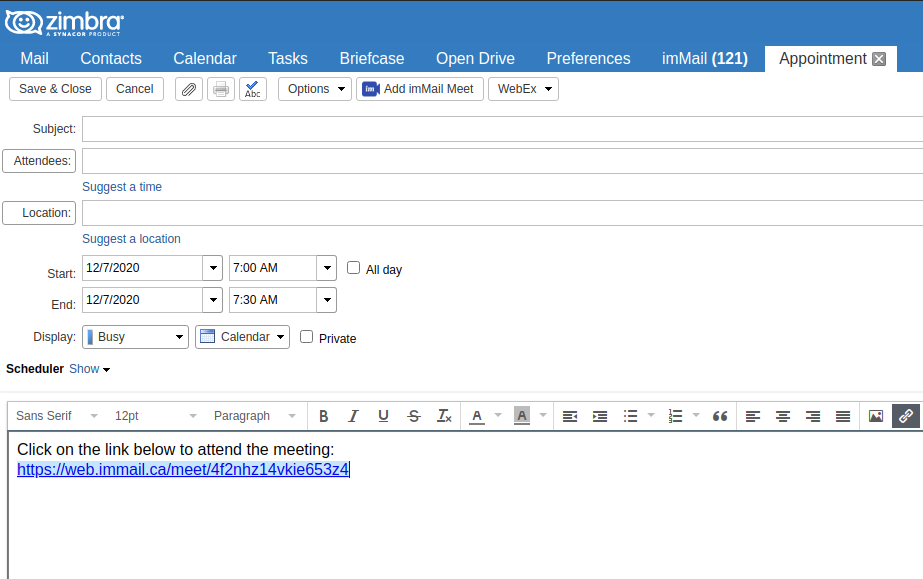
- Add videoconference link on Zimbra calendar
The application can also be integrated with your internal systems, allowing your employees to query data and make transactions from a single place. Check our API documentation for further information.
Is this free?
Yes, you can download this version of imMail for free and use as long as you want. imMail also offers you some enterprise features. Feel free to know and buy them becoming an enterprise user.
Languages
The imMail Zimlet is available in the following languages:
- English
- Portuguese
- Spanish
Need further information? Please download the app and open a conversation with support@immail.ca . We will be glad to see and help you there ;)
Zimbra & imMail Integration
Here you will find important instructions to install a Zimlet that makes possible the integration between Zimbra Collaboration Server and imMail (Instant Messenger for Companies), and make an amazing integration with both inside the Zimbra Web Client.
Installation
Follow the steps below or click here to watch the video tutorial.
Single Sign-on Integration
This Zimlet supports optional single sign-on to imMail using the imMail API. That way you only need to maintain the user accounts on Zimbra. The account creation can be done via LDAP import or by the own user on imMail platform, but in both cases you still be logged on automatically (single sign-on integration). Or you can just deploy only the Zimlet and let the user decide on the authentication (basic integration).
If you do not want to activate the Single Sign-on option, skip this step and go straight to the Basic Integration.
API KEY
In order to allow the integration with imMail, will be necessary to generate an API KEY.
Go to www.immail.ca;
If the domain that you want to configure already has an admin account in imMail, log in. Otherwise, create a new account (the first account created for each domain always will be the user admin);
Click the menu button on the top side of the screen and choose the "Manage Domain" option;
Go to API KEY tab;

Click on the "Generate API KEY" button;
Copy the created API KEY and save it in a safe place.
Java extension configuration
1 - For Single Sign-on Integration you have to set-up the Java server extension. Download the extension.jar file and copy it to /opt/zimbra/lib/ext/immail/extension.jar
Probably you will need to create the immail folder in /opt/zimbra/lib/ext. See the example below:
$ mkdir /opt/zimbra/lib/ext/immail
$ cp extension.jar /opt/zimbra/lib/ext/immail/extension.jar
2 - Then create the config.properties text file in /opt/zimbra/lib/ext/immail/config.properties with the contents:
    immailURL=https://api.immail.ca
    immailCreateTokenPath=/auth/token
3 - This Zimlet allows integration of multiple domains. In order to make it possible, it is necessary to create the file in /opt/zimbra/lib/ext/immail/config.domains.json as the example below:
Note that you have to set the apiKey and the correspondent domain. Each Api Key is unique and exclusive for each domain. If you have no Api Key, please, contact us via imMail App (support@immail.ca).
[
 {
  "domain": "companyxpto.com",
  "apiKey": "fbg3QZA9vZS9KCB62kb2E3mVWZu6Ez67"
 },
 {
  "domain": "companyxyz.com",
  "apiKey": "6SbkuQa9h6Te5N9yxJsGaPnWGFhXk2an"
 }
]
4 - Restart the service as follows:
$ zmmailboxdctl restart
Basic Integration
- Download the
ca_immail.zipfile into the server. - Change to zimbra user.
# su zimbra
- Execute the deploy command:
$ zmzimletctl deploy ca_immail.zip
- Grant permission to imMail domains.
$ zmprov mc default +zimbraProxyAllowedDomains *.immail.ca
- Clean up the Zimlet cache.
After update the zimlet you may have to clean up the cache.
$ zmprov flushCache zimlet
- Make sure Zimlet is active for users.
LDAP Integration
In order to keep synchronized the user data in both platforms, Zimbra and imMail, the LDAP data should be configured on imMail.
Go to www.immail.ca;
If the domain that you want to configure already has an admin account in imMail, log in. Otherwise create a new account (the first account created for each domain always will be the user admin);
Click the menu button on the top side of the screen and choose the "Manage Domain" option;
Go to AD/LDAP integration tab and fill in the LDAP data. See the example below:

Note that you might create an LDAP search filter. If you provide "Base" and "Filter" data, as the picture below, you'll be able to import all users from the current domain.
- Click on "Save";
At this point, before to start the import process, your server firewall must to be configured to allow the imMail servers IPs 52.67.75.8, 52.71.245.84 and 13.127.134.188
- After that, click on "Sync AD/LDAP" in order to import the Zimbra users.
Enjoy it!
Important Notes
No information related to LDAP will be presented into the imMail tab.
If someone has a problem like this on Chrome, the browser can be blocking third-party cookies.
To find the setting option screen/windows, open Chrome settings, type "content" in the search box, click the Content Settings option, then click the Cookies option and uncheck the option that says something like this "Block third-party cookies and site data".
Click here for more info.
Support
If you have any trouble, please email us through support@immail.ca. We will be glad to help you with this integration.
Helpful Links
| Rating | ( 3 ratings ) |
| Downloads | 6381 |
| Latest Version | 0.8.1 |
| Categories | Chat , Video |
| Compatibility | ZCS 8.8.x |
| License | No License Specified |
| Created | on 1/8/20 |
| Updated | on 7/27/21 |
Reviews
-
Future of collaboration
By: Juan_09 on on 7/28/20 for version 0.6
-
User Expirience
By: Michael2890 on on 7/28/20 for version 0.6
-
Chatting
By: Narmin_Huseynov on on 7/7/20 for version 0.6
Older Versions:
Version 0.8.1
Download| Compatibility | ZCS 8.8.x |
| Created | 12/15/20, 5:49 AM |
Use imMail Zimlet to:
- Talk to your employees and suppliers
- Create messaging groups
- Create, Assign and Manage Tasks
- Do Video Conferences
- Send an instant message to all employees
- Upload and share documents and directories
- Integrate with HR, CRM, ERP and SCM platforms
- Add videoconference link on Zimbra calendar
The application can also be integrated with your internal systems, allowing your employees to query data and make transactions from a single place. Check our API documentation for further information.
Is this free?
Yes, you can download this version of imMail for free and use as long as you want. imMail also offers you some enterprise features. Feel free to know and buy them becoming an enterprise user.
Languages
The imMail Zimlet is available in the following languages:
- English
- Portuguese
- Spanish
Need further information? Please download the app and open a conversation with support@immail.ca . We will be glad to see and help you there ;)
Zimbra & imMail Integration
Here you will find important instructions to install a Zimlet that makes possible the integration between Zimbra Collaboration Server and imMail (Instant Messenger for Companies), and make an amazing integration with both inside the Zimbra Web Client.
Installation
Follow the steps below or click here to watch the video tutorial.
Single Sign-on Integration
This Zimlet supports optional single sign-on to imMail using the imMail API. That way you only need to maintain the user accounts on Zimbra. The account creation can be done via LDAP import or by the own user on imMail platform, but in both cases you still be logged on automatically (single sign-on integration). Or you can just deploy only the Zimlet and let the user decide on the authentication (basic integration).
If you do not want to activate the Single Sign-on option, skip this step and go straight to the Basic Integration.
API KEY
In order to allow the integration with imMail, will be necessary to generate an API KEY.
Go to www.immail.ca;
If the domain that you want to configure already has an admin account in imMail, log in. Otherwise, create a new account (the first account created for each domain always will be the user admin);
Click the menu button on the top side of the screen and choose the "Manage Domain" option;
Go to API KEY tab;
Click on the "Generate API KEY" button;
Copy the created API KEY and save it in a safe place.
Java extension configuration
1 - For Single Sign-on Integration you have to set-up the Java server extension. Download the extension.jar file and copy it to /opt/zimbra/lib/ext/immail/extension.jar
Probably you will need to create the immail folder in /opt/zimbra/lib/ext. See the example below:
$ mkdir /opt/zimbra/lib/ext/immail
$ cp extension.jar /opt/zimbra/lib/ext/immail/extension.jar
2 - Then create the config.properties text file in /opt/zimbra/lib/ext/immail/config.properties with the contents:
    immailURL=https://api.immail.ca
    immailCreateTokenPath=/auth/token
3 - This Zimlet allows integration of multiple domains. In order to make it possible, it is necessary to create the file in /opt/zimbra/lib/ext/immail/config.domains.json as the example below:
Note that you have to set the apiKey and the correspondent domain. Each Api Key is unique and exclusive for each domain. If you have no Api Key, please, contact us via imMail App (support@immail.ca).
[
 {
  "domain": "companyxpto.com",
  "apiKey": "fbg3QZA9vZS9KCB62kb2E3mVWZu6Ez67"
 },
 {
  "domain": "companyxyz.com",
  "apiKey": "6SbkuQa9h6Te5N9yxJsGaPnWGFhXk2an"
 }
]
4 - Restart the service as follows:
$ zmmailboxdctl restart
Basic Integration
- Download the
ca_immail.zipfile into the server. - Change to zimbra user.
# su zimbra
- Execute the deploy command:
$ zmzimletctl deploy ca_immail.zip
- Grant permission to imMail domains.
$ zmprov mc default +zimbraProxyAllowedDomains *.immail.ca
- Clean up the Zimlet cache.
After update the zimlet you may have to clean up the cache.
$ zmprov flushCache zimlet
- Make sure Zimlet is active for users.
LDAP Integration
In order to keep synchronized the user data in both platforms, Zimbra and imMail, the LDAP data should be configured on imMail.
Go to www.immail.ca;
If the domain that you want to configure already has an admin account in imMail, log in. Otherwise create a new account (the first account created for each domain always will be the user admin);
Click the menu button on the top side of the screen and choose the "Manage Domain" option;
Go to AD/LDAP integration tab and fill in the LDAP data. See the example below:
Note that you might create an LDAP search filter. If you provide "Base" and "Filter" data, as the picture below, you'll be able to import all users from the current domain.
- Click on "Save";
At this point, before to start the import process, your server firewall must to be configured to allow the imMail servers IPs 52.67.75.8, 52.71.245.84 and 13.127.134.188
- After that, click on "Sync AD/LDAP" in order to import the Zimbra users.
Enjoy it!
Important Notes
No information related to LDAP will be presented into the imMail tab.
If someone has a problem like this on Chrome, the browser can be blocking third-party cookies.
To find the setting option screen/windows, open Chrome settings, type "content" in the search box, click the Content Settings option, then click the Cookies option and uncheck the option that says something like this "Block third-party cookies and site data".
Click here for more info.
Support
If you have any trouble, please email us through support@immail.ca. We will be glad to help you with this integration.
Version 0.8.0
Download| Compatibility | ZCS 8.8.x |
| Created | 11/4/20, 3:35 AM |
Use imMail Zimlet to:
- Talk to your employees and suppliers
- Create messaging groups
- Create, Assign and Manage Tasks
- Do Video Conferences
- Send an instant message to all employees
- Upload and share documents and directories
- Integrate with HR, CRM, ERP and SCM platforms
- Add videoconference link on Zimbra calendar
The application can also be integrated with your internal systems, allowing your employees to query data and make transactions from a single place. Check our API documentation for further information.
Is this free?
Yes, you can download this version of imMail for free and use as long as you want. imMail also offers you some enterprise features. Feel free to know and buy them becoming an enterprise user.
Languages
The imMail Zimlet is available in the following languages:
- English
- Portuguese
- Spanish
Need further information? Please download the app and open a conversation with support@immail.ca . We will be glad to see and help you there ;)
Zimbra & imMail Integration
Here you will find important instructions to install a Zimlet that makes possible the integration between Zimbra Collaboration Server and imMail (Instant Messenger for Companies), and make an amazing integration with both inside the Zimbra Web Client.
Installation
Follow the steps below or click here to watch the video tutorial.
Single Sign-on Integration
This Zimlet supports optional single sign-on to imMail using the imMail API. That way you only need to maintain the user accounts on Zimbra. The account creation can be done via LDAP import or by the own user on imMail platform, but in both cases you still be logged on automatically (single sign-on integration). Or you can just deploy only the Zimlet and let the user decide on the authentication (basic integration).
If you do not want to activate the Single Sign-on option, skip this step and go straight to the Basic Integration.
API KEY
In order to allow the integration with imMail, will be necessary to generate an API KEY.
Go to www.immail.ca;
If the domain that you want to configure already has an admin account in imMail, log in. Otherwise, create a new account (the first account created for each domain always will be the user admin);
Click the menu button on the top side of the screen and choose the "Manage Domain" option;
Go to API KEY tab;
Click on the "Generate API KEY" button;
Copy the created API KEY and save it in a safe place.
Java extension configuration
1 - For Single Sign-on Integration you have to set-up the Java server extension. Download the extension.jar file and copy it to /opt/zimbra/lib/ext/immail/extension.jar
Probably you will need to create the immail folder in /opt/zimbra/lib/ext. See the example below:
$ mkdir /opt/zimbra/lib/ext/immail
$ cp extension.jar /opt/zimbra/lib/ext/immail/extension.jar
2 - Then create the config.properties text file in /opt/zimbra/lib/ext/immail/config.properties with the contents:
    immailURL=https://api.immail.ca
    immailCreateTokenPath=/auth/token
3 - This Zimlet allows integration of multiple domains. In order to make it possible, it is necessary to create the file in /opt/zimbra/lib/ext/immail/config.domains.json as the example below:
Note that you have to set the apiKey and the correspondent domain. Each Api Key is unique and exclusive for each domain. If you have no Api Key, please, contact us via imMail App (support@immail.ca).
[
 {
  "domain": "companyxpto.com",
  "apiKey": "fbg3QZA9vZS9KCB62kb2E3mVWZu6Ez67"
 },
 {
  "domain": "companyxyz.com",
  "apiKey": "6SbkuQa9h6Te5N9yxJsGaPnWGFhXk2an"
 }
]
4 - Restart the service as follows:
$ zmmailboxdctl restart
Basic Integration
- Download the
ca_immail.zipfile into the server. - Change to zimbra user.
# su zimbra
- Execute the deploy command:
$ zmzimletctl deploy ca_immail.zip
- Grant permission to imMail domains.
$ zmprov mc default +zimbraProxyAllowedDomains *.immail.ca
- Clean up the Zimlet cache.
After update the zimlet you may have to clean up the cache.
$ zmprov flushCache zimlet
- Make sure Zimlet is active for users.
LDAP Integration
In order to keep synchronized the user data in both platforms, Zimbra and imMail, the LDAP data should be configured on imMail.
Go to www.immail.ca;
If the domain that you want to configure already has an admin account in imMail, log in. Otherwise create a new account (the first account created for each domain always will be the user admin);
Click the menu button on the top side of the screen and choose the "Manage Domain" option;
Go to AD/LDAP integration tab and fill in the LDAP data. See the example below:
Note that you might create an LDAP search filter. If you provide "Base" and "Filter" data, as the picture below, you'll be able to import all users from the current domain.
- Click on "Save";
At this point, before to start the import process, your server firewall must to be configured to allow the imMail servers IPs 52.67.75.8, 52.71.245.84 and 13.127.134.188
- After that, click on "Sync AD/LDAP" in order to import the Zimbra users.
Enjoy it!
Important Notes
No information related to LDAP will be presented into the imMail tab.
If someone has a problem like this on Chrome, the browser can be blocking third-party cookies.
To find the setting option screen/windows, open Chrome settings, type "content" in the search box, click the Content Settings option, then click the Cookies option and uncheck the option that says something like this "Block third-party cookies and site data".
Click here for more info.
Support
If you have any trouble, please email us through support@immail.ca. We will be glad to help you with this integration.
Version 0.7.3
Download| Compatibility | ZCS 8.8.x |
| Created | 10/27/20, 6:57 PM |
Use imMail Zimlet to:
- Talk to your employees and suppliers
- Create messaging groups
- Create, Assign and Manage Tasks
- Do Video Conferences
- Send an instant message to all employees
- Upload and share documents and directories
- Integrate with HR, CRM, ERP and SCM platforms
The application can also be integrated with your internal systems, allowing your employees to query data and make transactions from a single place. Check our API documentation for further information.
Is this free?
Yes, you can download this version of imMail for free and user as long as you want. imMail also offers you some enterprise features. Feel free to know and buy them becoming an enterprise user.
Languages
The imMail Zimlet is available in the following languages:
- English
- Portuguese
Need further information? Please Download the app and open a conversation with support@immail.ca . We will be glad to see and help you there ;)
Zimbra & imMail Integration
Here you will find important instructions to install a Zimlet that makes possible the integration bScreenshot from 2020-02-17 13-07-46etween Zimbra Collaboration Server and imMail (Instant Messenger for Companies), and make an amazing integration with both inside the Zimbra Web Client.
Installation
Follow the steps below or click here to watch the video tutorial.
Single Sign-on Integration
This Zimlet supports optional single sign-on to imMail using the imMail API. That way you only need to maintain the user accounts on Zimbra. The account creation can be done via LDAP import or by the own user on imMail platform, but in both cases you still be logged on automatically (single sign-on integration). Or you can just deploy only the Zimlet and let the user decide on the authentication (basic integration).
If you do not want to activate the Single Sign-on option, skip this step and go straight to the Basic Integration.
API KEY
In order to allow the integration with imMail, will be necessary to generate an API KEY.
Go to www.immail.ca;
If the domain that you want to configure already has an admin account in imMail, log in. Otherwise, create a new account (the first account created for each domain always will be the user admin);
Click the menu button on the top side of the screen and choose the "Manage Domain" option;
Go to API KEY tab;
Click on "Gerar API KEY" button;
Copy the created API KEY and save in a safe place.
Java extension configuration
1 - For Single Sign-on Integration you have to set-up the Java server extension. Download the extension.jar file and copy it to /opt/zimbra/lib/ext/immail/extension.jar
Probably you will need to create the immail folder in /opt/zimbra/lib/ext. See the example below:
$ mkdir /opt/zimbra/lib/ext/immail
$ cp extension.jar /opt/zimbra/lib/ext/immail/extension.jar
2 - Then create the config.properties text file in /opt/zimbra/lib/ext/immail/config.properties with the contents:
    immailURL=https://api.immail.ca
    immailCreateTokenPath=/auth/token
3 - This Zimlet allows integration of multiple domains. In order to make it possible, it is necessary to create the file in /opt/zimbra/lib/ext/immail/config.domains.json as the example below:
Note that you have to set the apiKey and the correspondent domain. Each Api Key is unique and exclusive for each domain. If you have no Api Key, please, contact us via imMail App (support@immail.ca).
[
 {
  "domain": "companyxpto.com",
  "apiKey": "fbg3QZA9vZS9KCB62kb2E3mVWZu6Ez67"\
 },
 {
  "domain": "companyxyz.com",
  "apiKey": "6SbkuQa9h6Te5N9yxJsGaPnWGFhXk2an"
 }
]
4 - Restart the service as follows:
$ zmmailboxdctl restart
Basic Integration
- Download the
ca_immail.zipfile into the server. - Change to zimbra user.
# su zimbra
- Execute the deploy command:
$ zmzimletctl deploy ca_immail.zip
- Grant permission to imMail domains.
$ zmprov mc default +zimbraProxyAllowedDomains *.immail.ca
- Clean up the Zimlet cache.
After update the zimlet you may have to clean up the cache.
$ zmprov flushCache zimlet
- Make sure Zimlet is active for users.
LDAP Integration
In order to keep synchronized the user data in both platforms, Zimbra and imMail, the LDAP data should be configured on imMail.
Go to www.immail.ca;
If the domain that you want to configure already has an admin account in imMail, log in. Otherwise create a new account (the first account created for each domain always will be the user admin);
Click the menu button on the top side of the screen and choose the "Manage Domain" option;
Go to AD/LDAP integration tab and fill in the LDAP data. See the example below:
Note that you might create an LDAP search filter. If you provide "Base" and "Filter" data, as the picture below, you'll be able to import all users from the current domain.
- Click on "Save";
At this point, before to start the import process, your server firewall must to be configured to allow the imMail servers IPs 52.67.75.8, 18.231.25.161 and 13.127.134.188
- After that, click on "Sync AD/LDAP" in order to import the Zimbra users.
Enjoy it!
Important Notes
No information related to LDAP will be presented into the imMail tab.
If someone has a problem like this on Chrome, the browser can be blocking third-party cookies.
To find the setting option screen/windows, open Chrome settings, type "content" in the search box, click the Content Settings option, then click the Cookies option and uncheck the option that says something like this "Block third-party cookies and site data".
Click here for more info.
Support
If you have any trouble, please email us through support@immail.ca. We will be glad to help you with this integration.
Version 0.7.1
Download| Compatibility | ZCS 8.8.x |
| Created | 1/8/20, 1:42 AM |
Use imMail Zimlet to:
- Talk to your employees and suppliers
- Create messaging groups
- Create, Assign and Manage Tasks
- Do Video Conferences
- Send an instant message to all employees
- Upload and share documents and directories
- Integrate with HR, CRM, ERP and SCM platforms
The application can also be integrated with your internal systems, allowing your employees to query data and make transactions from a single place. Check our API documentation for further information.
Is this free?
Yes, you can download this version of imMail for free and user as long as you want. imMail also offers you some enterprise features. Feel free to know and buy them becoming an enterprise user.
Languages
The imMail Zimlet is available in the following languages:
- English
- Portuguese
Need further information? Please Download the app and open a conversation with support@immail.ca . We will be glad to see and help you there ;)
Zimbra & imMail Integration
Here you will find important instructions to install a Zimlet that makes possible the integration bScreenshot from 2020-02-17 13-07-46etween Zimbra Collaboration Server and imMail (Instant Messenger for Companies), and make an amazing integration with both inside the Zimbra Web Client.
Installation
Follow the steps below or click here to watch the video tutorial.
Single Sign-on Integration
This Zimlet supports optional single sign-on to imMail using the imMail API. That way you only need to maintain the user accounts on Zimbra. The account creation can be done via LDAP import or by the own user on imMail platform, but in both cases you still be logged on automatically (single sign-on integration). Or you can just deploy only the Zimlet and let the user decide on the authentication (basic integration).
If you do not want to activate the Single Sign-on option, skip this step and go straight to the Basic Integration.
API KEY
In order to allow the integration with imMail, will be necessary to generate an API KEY.
Go to www.immail.ca;
If the domain that you want to configure already has an admin account in imMail, log in. Otherwise, create a new account (the first account created for each domain always will be the user admin);
Click the menu button on the top side of the screen and choose the "Manage Domain" option;
Go to API KEY tab;
Click on "Gerar API KEY" button;
Copy the created API KEY and save in a safe place.
Java extension configuration
1 - For Single Sign-on Integration you have to set-up the Java server extension. Download the extension.jar file and copy it to /opt/zimbra/lib/ext/immail/extension.jar
Probably you will need to create the immail folder in /opt/zimbra/lib/ext. See the example below:
$ mkdir /opt/zimbra/lib/ext/immail
$ cp extension.jar /opt/zimbra/lib/ext/immail/extension.jar
2 - Then create the config.properties text file in /opt/zimbra/lib/ext/immail/config.properties with the contents:
    immailURL=https://api.immail.ca
    immailCreateTokenPath=/auth/token
3 - This Zimlet allows integration of multiple domains. In order to make it possible, it is necessary to create the file in /opt/zimbra/lib/ext/immail/config.domains.json as the example below:
Note that you have to set the apiKey and the correspondent domain. Each Api Key is unique and exclusive for each domain. If you have no Api Key, please, contact us via imMail App (support@immail.ca).
[
 {
  "domain": "companyxpto.com",
  "apiKey": "fbg3QZA9vZS9KCB62kb2E3mVWZu6Ez67"\
 },
 {
  "domain": "companyxyz.com",
  "apiKey": "6SbkuQa9h6Te5N9yxJsGaPnWGFhXk2an"
 }
]
4 - Restart the service as follows:
$ zmmailboxdctl restart
Basic Integration
- Download the
ca_immail.zipfile into the server. - Change to zimbra user.
# su zimbra
- Execute the deploy command:
$ zmzimletctl deploy ca_immail.zip
- Grant permission to imMail domains.
$ zmprov mc default +zimbraProxyAllowedDomains *.immail.ca
- Clean up the Zimlet cache.
After update the zimlet you may have to clean up the cache.
$ zmprov flushCache zimlet
- Make sure Zimlet is active for users.
LDAP Integration
In order to keep synchronized the user data in both platforms, Zimbra and imMail, the LDAP data should be configured on imMail.
Go to www.immail.ca;
If the domain that you want to configure already has an admin account in imMail, log in. Otherwise create a new account (the first account created for each domain always will be the user admin);
Click the menu button on the top side of the screen and choose the "Manage Domain" option;
Go to AD/LDAP integration tab and fill in the LDAP data. See the example below:
Note that you might create an LDAP search filter. If you provide "Base" and "Filter" data, as the picture below, you'll be able to import all users from the current domain.
- Click on "Save";
At this point, before to start the import process, your server firewall must to be configured to allow the imMail servers IPs 52.67.75.8, 18.231.25.161 and 13.127.134.188
- After that, click on "Sync AD/LDAP" in order to import the Zimbra users.
Enjoy it!
Important Notes
No information related to LDAP will be presented into the imMail tab.
If someone has a problem like this on Chrome, the browser can be blocking third-party cookies.
To find the setting option screen/windows, open Chrome settings, type "content" in the search box, click the Content Settings option, then click the Cookies option and uncheck the option that says something like this "Block third-party cookies and site data".
Click here for more info.
Support
If you have any trouble, please email us through support@immail.ca. We will be glad to help you with this integration.